Showing posts with label Candy. Show all posts

Thursday, December 8, 2011

Sweet (irresistible) snack


Nutty Cereal Mix

(I have no idea what it’s truly called because I didn’t ask for the recipe name!)

Yield: A LOT – Believe it or not, this was doubled in many of the recipes I researched.

INGREDIENTS

1 cup butter

1 cup white sugar

1 cup light corn syrup

1/2 cup flaked coconut

20 oz. cereal – Crispix, Rice Chex, Corn Chex, Honey Nut Chex

3/4 cup sliced almonds (toasted under a broiler until nicely browned)

DIRECTIONS: Boil butter, sugar, and corn syrup for 3 minutes. 

008 (3)

009 (3)

Measure cereal, coconut, and almonds into a large bowl. 

004 (3)

006 (3)

Pour syrup over the mixture and stir until coated. 

011 (2)

Spread the mixture out on waxed paper to cool.  Store in an airtight container.

Note:  The almonds can be omitted or reduced, and the coconut can be reduced, as well, to suit individual tastes.  Either way, it won’t last long!

Saturday, February 13, 2010

Caramel Puff Corn

Caramel corn has always been a favorite snack of mine.  But, this may actually be better than ‘regular’ caramel corn … no hulls to get stuck between teeth!  It was snowing like the dickens today, so I made a batch.  I had intended to make it for a Superbowl snack, but really wasn’t in the mood after our favored team wasn’t IN the Superbowl.  It’ll be a perfect movie or game-night snack.

001 (4) 

Caramel Puff Corn
Yield:  15 servings

Ingredients:
2 – 4.5 oz. bags Puff Corn

1/2 cup light corn syrup
1 cup brown sugar
1 cup butter
1 tsp. baking soda


Directions:
1.  Preheat oven to 250 degrees.
2.  Spray a large roaster with cooking spray and put the puffed corn in the roaster.
3.  Combine brown sugar, butter and corn syrup in a saucepan.  Bring to a boil and continue boiling for 2 minutes.
4.  Add baking soda.  Expect the caramel to expand.  Pour over the puffed corn and mix thoroughly.
5.  Place roaster in the oven for 45 minutes.  Stir the puffed corn every 15 minutes.
6.  Remove from oven when done and spread over waxed paper to cool.

Wednesday, December 16, 2009

Suzie's Divinity

Suzie’s Divinity
Yield: about 6 1/2 dozen

Ingredients:
2 2/3 cups sugar
2/3 cup light corn syrup
½ cup water
2 egg whites
1 tsp. flavor extract (Almond is my favorite, but Vanilla is most common)

Directions:
1. Mix sugar, corn syrup and water in an 8-cup microwavable measure or bowl (I use my Pampered Chef Large Batter Bowl) until sugar is thoroughly moistened.


2. Microwave uncovered on high for 5 minutes, take out and stir, return to microwave and heat for another 5 minutes. The original recipe said 13-15 minutes, but my microwave gets the syrup to hard ball stage (260 degrees on a candy thermometer) at 10 minutes. This part will take a little bit of experimentation, but once you figure out your microwave, write it down on your copy of the recipe. If you need more than 10 minutes, you’ll want to stir the mixture every 5 minutes.

*Before microwaving the sugar mixture, I separate the eggs and put the egg whites in my mixing bowl.  I lay out my waxed paper while the sugar mixture is in the microwave.  When there is 2-3 minutes left on the microwave, I start up my Kitchen-Aid mixer.  This is the perfect amount of time to have the egg whites at stiff peak stage.

3. Beat egg whites in medium bowl (I use a Kitchen-Aid stand mixer for ease) until stiff peaks form. In my mixer, the egg whites are stiff in about 2 minutes at high speed.

4. Continue beating while pouring hot syrup in a thin stream into egg whites, beating constantly on medium speed.


5. Add Almond extract. **It’s so easy to forget this step. Set out your flavoring near the mixer as a reminder!** Beat until the mixture holds its shape and becomes slightly dull. The dullness is key for me.


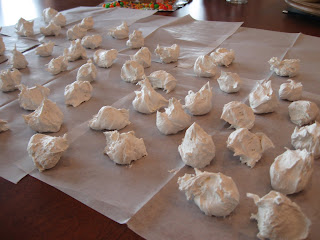
6. Drop mixture from teaspoons onto waxed paper. Let stand at room temperature until the candies feel firm.


7. Freeze in an air tight container between layers of waxed paper.  Each batch makes about 6 1/2 dozen - 'little larger than a tablespoon' sized drops of Divinity.

Note: Some prefer to add nuts. You can add 2/3 cups of coarsely chopped nuts at the end of step 5, but I think it spoils the Divinity! I expect Divinity to melt in my mouth and nuts obviously thwart that expectation.

Tuesday, December 15, 2009

Gingerbread House

Last year, Angelina made a gingerbread wreath (from a kit).  The gingerbread, frosting and candies must have been a couple years old because they tasted horrible!  Definitely NOT edible ... although my kids would have tried if I hadn't been afraid of teeth breaking.  However, she had a great time with the kit and it was a fun decoration on our table.


While in town yesterday, I saw a kit for a gingerbread house and, on a whim, I purchased it for Angelina. 


This kit is newer and says that the gingerbread house is edible ... if eaten within two weeks.  The kids plan to eat it after we return from Grandma and Grandpa Golden Acres' farm.  We'll see how good it tastes after that long!


Chock full of sugar ... a kid's dream concoction!

Monday, December 22, 2008

Shortbread Creations

Shortbread is another of my favorite cookies (I don't think I remembered it for my list, though). I like to purchase the shortbread cookies in bulk. The tins are beautiful and can be used for candy and gifts afterwards. With just a few extra ingredients, these cookies can be dressed up into tasty Christmas cookies that everyone will enjoy. They are even easy for kids to decorate!


Dipped Shortbread
Yield: You decide!

Ingredients can include, but are not limited to the following:
Shortbread cookies
1/4 pkg. Ghirardelli chocolate - either milk chocolate or white chocolate - purchased in approx. 2.5 pound packages
Nuts - pecans, cashews, peanuts
Candy - a variety of sprinkles, crushed candy canes, etc.

Lay out waxed paper to cool the dipped cookies. Melt the chocolate in the microwave for 1 minute; remove and stir. If the chocolate is not completely smooth, melt for an additional 30 seconds. Dip half the cookie in the chocolate - I try to only dip the front side of the cookies. Place the dipped cookie on the waxed paper. (If you are quick, you may be able to dip all the cookies before sprinkling the toppings. However, I usually dip two cookies and then sprinkle, to make sure the topping will stick.) Next, sprinkle the chocolate dipped portion of the cookie with nuts or candy. Let the chocolate harden.* Move the cookies to tins or plastic containers for freezing or storage.


*Sometimes, I speed the process along by placing the waxed paper on cookie sheets. When the cookie sheet is full, I place it in the frig or freezer to harden the chocolate faster.

This is the package of shortbread cookies I used. The cookies are wrapped in two stacks of about 10 cookies each within the tins. Sometimes there is a little breakage, but not much (besides, we all need a sample!). There are enough cookies in the package to let you try a variety of toppings.

Another decorating option that I've used is to drizzle either chocolate over the cookies. Just melt the chocolate in a quart-size freezer ziploc baggie for about 45 seconds to 1 minute. Squish around in the bag until completely melted. Snip the corner of the bag and squeeze out the chocolate; drizzling over the cookies (the cookies have been placed on waxed paper). Let the chocolate harden and then store.

Thursday, December 11, 2008

Candy-Making Tips

On the same page as the Buttery Cashew Brittle, Better Homes and Gardens Magazine from December 1997, the author offered some candy-making tips that would be helpful to all of us. Candy usually has expensive ingredients and is more time-consuming to make than cookies or cakes. It would be better to make sure that our thermometers and supplies are in working order before starting a batch of candy - than find out after the fact that the candy failed to set up because the thermometer was broken!


Here are the tips:


1. Candy mixtures should be cooked to the exact temperatures the recipe calls for. A good candy thermometer is a worthwhile investment. Before you start to make candy, test your thermometer with boiling water.


2. Use only wooden spoons for stirring candy mixtures.


3. Make homemade candy on a dry day. Candy mixtures react to the humidity in the air. If the humidity goes above 60 percent, your candy may not set properly.


4. Only butter should be used in candy recipes unless the recipe specifically allows for margarine to be used instead. If using margarine, make sure it is not a reduced-fat variety.


Here are a few additional tips from me!


5. Always set out all the ingredients. I cannot tell you how many times I've forgotten to add the vanilla or almond extract to my Divinity! We still eat it, but that extra flavor is missing. If all the ingredients are set out, you can SEE what has or has not been added, especially if you are in the habit of putting away or moving used items to a 'used ingredient' spot.


6. Don't overdo it. Being able to spread the baking out over November and December, then freezing the goodies is my favorite way to lessen the stress. Most goodies can be frozen for a month or two without any difference in taste, especially if they are well packaged.


7. Save those tins! From Boy Scout popcorn tins to Schwans ice cream tins to Sams cookie tins . . . they will all be useful for storing your goodies or providing a showy, pre-decorated package for your goodie gifts to friends, neighbors or relatives. An additional bonus is that they hold up well in the freezer and protect your goodies from freezer burn when lined with wax paper, foil, or saran wrap.


If I think of more tips, I'll add them later.

Wednesday, December 10, 2008

Cashew Brittle


My second favorite holiday treat is Cashew Brittle. I found this recipe eleven years ago and have made one or two batches every year. It makes a great gift! I’ve been asked for this recipe many times and have been happy to share. After tasting this, peanut brittle just doesn’t cut it!!

Warning to Moms with young children: this is a recipe that requires your attention, so make sure the kids are entertained before you start.


Favorites Forever: Buttery Cashew Brittle
By David Feder in Better Homes and Gardens Magazine, December 1997
(I told you some of these magazines had been around awhile! This is from the year my oldest son was born.)

2 cups sugar
1 cup light corn syrup
½ cup water
1 cup butter
3 cups cashews (the recipe calls for raw, but I always end up using salted cashews purchased in bulk – that way my husband has a treat ‘before the treat’)
1 tsp. baking soda

In a 3-quart saucepan combine sugar, corn syrup, and water. Cook and stir until sugar dissolves. Bring syrup to boiling; add butter and stir until butter is melted. Clip a candy thermometer to the side of the pan. Reduce heat to medium low; continue boiling at a moderate, steady rate, stirring occasionally, until thermometer registers 280 degrees (about 35 minutes). This is the soft-crack stage.


Stir in the cashews; continue cooking over medium-low heat stirring frequently until thermometer registers 300 degrees (10 to 15 minutes more). This is the hard-crack stage.


Remove mixture from heat; remove thermometer. Quickly stir in the baking soda, mixing thoroughly. Pour mixture into two buttered (okay, I did use spray!) baking sheets or 15x10x1 inch pans.


As the cashew brittle cools, stretch it out by lifting and pulling with two forks from the edges. Loosen from pans as soon as possible; pick up sections and break them into bite-size pieces. Store tightly covered. Makes about 2 ½ pounds (72 servings).


Up Close and Yummy!