Thursday, December 31, 2009

Christmas Gifts

I am now the proud owner of three new cookbooks! 

One was a gift from Eric and the kids ... OK, I purchased it & it somehow became part of the gift that said "To: Suzie   From: Eric & the Kids" ... I'm sure at least a few of you know how that works!!


The next was included in the Wii Fit bundle that the kids received from Santa.  Technically, my name wasn't on it, but I'm claiming it and will  be happy to test and serve entrees and sides to my kids ...


And, finally, the following from a good friend, Sarah (also Leo's Godmother).  How she knew I didn't already have this cookbook ... I'll never know ... it was on my wishlist, too!


Fun, fun, fun in the NEW YEAR with new recipes to sink our teeth into.

Wednesday, December 30, 2009

Peppermint Sticks

... or Candy Cane Cookies ... whichever is easier for your kids!

We opted for Peppermint Sticks, except that they are not peppermint flavored, they're just mint!  Doesn't really matter, mint is a preference and I didn't have peppermint extract on hand.

Peppermint Sticks
Yield:  Approx. 4 dozen

1 cup butter, softened (no substitutions)
1 cup confectioners' sugar (also known as powdered sugar)
1 egg
2 1/2 cups all-purpose flour
1 tsp. salt
1/2 tsp. green food coloring (my preference ... but red is great, too)
1/2 tsp. peppermint or mint extract

Mix butter, confectioners' sugar, and egg in a large bowl.  Blend in the flour and salt.  Divide the dough in half, placing half in a smaller mixing bowl.  Blend food coloring and extract into the half in the bowl.  Cover both halves with plastic wrap and chill for 1 hour (I completely skipped this step without problem).

Heat oven to 350 degrees. 

Take 1 tsp. colored dough and shape into a 4 inch long rope (we used 1 1/2 tsp for the sticks).  Repeat with white dough.   Roll on a lightly floured surface for smooth, even ropes.  Place the ropes side by side and press together lightly.  Twist!  Place 2 inches apart on an ungreased cookie sheet.  To create candy canes, curve the top of each cookie down to form a handle or J.  Bake 11 minutes or until set and lightly browned.  Carefully remove cookies to a cooling rack.


Angelina and Dash roll the ropes while Graham watches their progress


Pre-baked 'sticks'


Our Mint Sticks - YUM!

Wednesday, December 16, 2009

Suzie's Divinity

Suzie’s Divinity
Yield: about 6 1/2 dozen

Ingredients:
2 2/3 cups sugar
2/3 cup light corn syrup
½ cup water
2 egg whites
1 tsp. flavor extract (Almond is my favorite, but Vanilla is most common)

Directions:
1. Mix sugar, corn syrup and water in an 8-cup microwavable measure or bowl (I use my Pampered Chef Large Batter Bowl) until sugar is thoroughly moistened.


2. Microwave uncovered on high for 5 minutes, take out and stir, return to microwave and heat for another 5 minutes. The original recipe said 13-15 minutes, but my microwave gets the syrup to hard ball stage (260 degrees on a candy thermometer) at 10 minutes. This part will take a little bit of experimentation, but once you figure out your microwave, write it down on your copy of the recipe. If you need more than 10 minutes, you’ll want to stir the mixture every 5 minutes.

*Before microwaving the sugar mixture, I separate the eggs and put the egg whites in my mixing bowl.  I lay out my waxed paper while the sugar mixture is in the microwave.  When there is 2-3 minutes left on the microwave, I start up my Kitchen-Aid mixer.  This is the perfect amount of time to have the egg whites at stiff peak stage.

3. Beat egg whites in medium bowl (I use a Kitchen-Aid stand mixer for ease) until stiff peaks form. In my mixer, the egg whites are stiff in about 2 minutes at high speed.

4. Continue beating while pouring hot syrup in a thin stream into egg whites, beating constantly on medium speed.


5. Add Almond extract. **It’s so easy to forget this step. Set out your flavoring near the mixer as a reminder!** Beat until the mixture holds its shape and becomes slightly dull. The dullness is key for me.


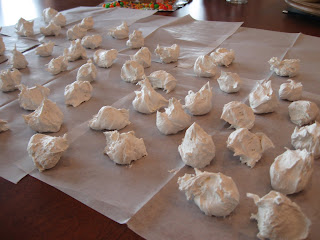
6. Drop mixture from teaspoons onto waxed paper. Let stand at room temperature until the candies feel firm.


7. Freeze in an air tight container between layers of waxed paper.  Each batch makes about 6 1/2 dozen - 'little larger than a tablespoon' sized drops of Divinity.

Note: Some prefer to add nuts. You can add 2/3 cups of coarsely chopped nuts at the end of step 5, but I think it spoils the Divinity! I expect Divinity to melt in my mouth and nuts obviously thwart that expectation.

Tuesday, December 15, 2009

Gingerbread House

Last year, Angelina made a gingerbread wreath (from a kit).  The gingerbread, frosting and candies must have been a couple years old because they tasted horrible!  Definitely NOT edible ... although my kids would have tried if I hadn't been afraid of teeth breaking.  However, she had a great time with the kit and it was a fun decoration on our table.


While in town yesterday, I saw a kit for a gingerbread house and, on a whim, I purchased it for Angelina. 


This kit is newer and says that the gingerbread house is edible ... if eaten within two weeks.  The kids plan to eat it after we return from Grandma and Grandpa Golden Acres' farm.  We'll see how good it tastes after that long!


Chock full of sugar ... a kid's dream concoction!

Birthday cake...

... it's a little silly, but I'm making myself a birthday cake.  I saw a tantalizing picture of this cake


 in the catalog for this company and couldn't resist trying to make the blend of chocolate cake and mint ice cream.  I was going to make homemade fudge, but I purchased a jar ... just in case I got LAZY!  I'm going to use the jar of fudge

Ingredients:
Chocolate cake mix (plus eggs, oil & water)
Fudge - one jar
Peppermint Stick ice cream (from Schwans) or substitue Chocolate Chip Mint or your favorite minty flavor

Putting 'it' together:
The cake was baked last night, I let it cool on the counter overnight (you wouldn't need to wait that long!).


This morning, I leveled the cake by cutting off the rounded top with a serrated knife... I didn't want a leaning torte! .  I also cut the cake into thirds (lenthwise), so each section is a little over 4 inches wide and 9 inches long.  While preparing the cake and fudge, set the ice cream on the counter to thaw a bit.


Warm the fudge in the microwave until it is spreadable.  Spread 1/3 on the top of each cake section.  ** I didn't refrigerate at this point, but it would be a good step to add.  Then, your ice cream will not melt slightly like mine!


Spread ice cream over two sections - about 1/2 inch thick.  Stack the layers; the cake with only fudge goes on top.  Wrap the torte in plastic wrap and freeze for at least one hour.  If you want to make it 'pretty', sprinkle crushed peppermint cany over the top.  Slice as thick as needed and ENJOY!!


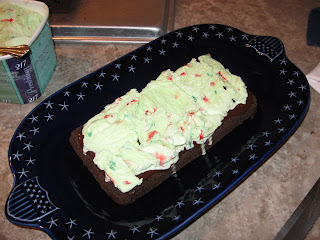
This is before freezing ... but doesn't it look yummy anyway??  I may or may not add crushed peppemints.  Maybe I'll just add another scoop of ice cream to the top of each slice.

** UPDATE:  Make sure to cool the layers of fudge topped cake in the frig before topping with ice cream.  My ice cream melted - pretty much all of it - even though I thought my fudge was cooled and the completed cake was taken to the freezer immediately.  It still tasted wonderful because the peppermint ice cream soaked into the cake layers, but it didn't look as pretty.