Thursday, December 31, 2009

Christmas Gifts

I am now the proud owner of three new cookbooks! 

One was a gift from Eric and the kids ... OK, I purchased it & it somehow became part of the gift that said "To: Suzie   From: Eric & the Kids" ... I'm sure at least a few of you know how that works!!


The next was included in the Wii Fit bundle that the kids received from Santa.  Technically, my name wasn't on it, but I'm claiming it and will  be happy to test and serve entrees and sides to my kids ...


And, finally, the following from a good friend, Sarah (also Leo's Godmother).  How she knew I didn't already have this cookbook ... I'll never know ... it was on my wishlist, too!


Fun, fun, fun in the NEW YEAR with new recipes to sink our teeth into.

Wednesday, December 30, 2009

Peppermint Sticks

... or Candy Cane Cookies ... whichever is easier for your kids!

We opted for Peppermint Sticks, except that they are not peppermint flavored, they're just mint!  Doesn't really matter, mint is a preference and I didn't have peppermint extract on hand.

Peppermint Sticks
Yield:  Approx. 4 dozen

1 cup butter, softened (no substitutions)
1 cup confectioners' sugar (also known as powdered sugar)
1 egg
2 1/2 cups all-purpose flour
1 tsp. salt
1/2 tsp. green food coloring (my preference ... but red is great, too)
1/2 tsp. peppermint or mint extract

Mix butter, confectioners' sugar, and egg in a large bowl.  Blend in the flour and salt.  Divide the dough in half, placing half in a smaller mixing bowl.  Blend food coloring and extract into the half in the bowl.  Cover both halves with plastic wrap and chill for 1 hour (I completely skipped this step without problem).

Heat oven to 350 degrees. 

Take 1 tsp. colored dough and shape into a 4 inch long rope (we used 1 1/2 tsp for the sticks).  Repeat with white dough.   Roll on a lightly floured surface for smooth, even ropes.  Place the ropes side by side and press together lightly.  Twist!  Place 2 inches apart on an ungreased cookie sheet.  To create candy canes, curve the top of each cookie down to form a handle or J.  Bake 11 minutes or until set and lightly browned.  Carefully remove cookies to a cooling rack.


Angelina and Dash roll the ropes while Graham watches their progress


Pre-baked 'sticks'


Our Mint Sticks - YUM!

Wednesday, December 16, 2009

Suzie's Divinity

Suzie’s Divinity
Yield: about 6 1/2 dozen

Ingredients:
2 2/3 cups sugar
2/3 cup light corn syrup
½ cup water
2 egg whites
1 tsp. flavor extract (Almond is my favorite, but Vanilla is most common)

Directions:
1. Mix sugar, corn syrup and water in an 8-cup microwavable measure or bowl (I use my Pampered Chef Large Batter Bowl) until sugar is thoroughly moistened.


2. Microwave uncovered on high for 5 minutes, take out and stir, return to microwave and heat for another 5 minutes. The original recipe said 13-15 minutes, but my microwave gets the syrup to hard ball stage (260 degrees on a candy thermometer) at 10 minutes. This part will take a little bit of experimentation, but once you figure out your microwave, write it down on your copy of the recipe. If you need more than 10 minutes, you’ll want to stir the mixture every 5 minutes.

*Before microwaving the sugar mixture, I separate the eggs and put the egg whites in my mixing bowl.  I lay out my waxed paper while the sugar mixture is in the microwave.  When there is 2-3 minutes left on the microwave, I start up my Kitchen-Aid mixer.  This is the perfect amount of time to have the egg whites at stiff peak stage.

3. Beat egg whites in medium bowl (I use a Kitchen-Aid stand mixer for ease) until stiff peaks form. In my mixer, the egg whites are stiff in about 2 minutes at high speed.

4. Continue beating while pouring hot syrup in a thin stream into egg whites, beating constantly on medium speed.


5. Add Almond extract. **It’s so easy to forget this step. Set out your flavoring near the mixer as a reminder!** Beat until the mixture holds its shape and becomes slightly dull. The dullness is key for me.


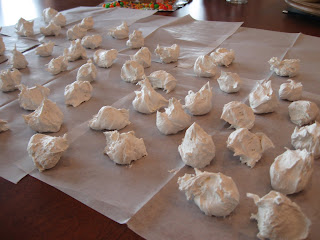
6. Drop mixture from teaspoons onto waxed paper. Let stand at room temperature until the candies feel firm.


7. Freeze in an air tight container between layers of waxed paper.  Each batch makes about 6 1/2 dozen - 'little larger than a tablespoon' sized drops of Divinity.

Note: Some prefer to add nuts. You can add 2/3 cups of coarsely chopped nuts at the end of step 5, but I think it spoils the Divinity! I expect Divinity to melt in my mouth and nuts obviously thwart that expectation.

Tuesday, December 15, 2009

Gingerbread House

Last year, Angelina made a gingerbread wreath (from a kit).  The gingerbread, frosting and candies must have been a couple years old because they tasted horrible!  Definitely NOT edible ... although my kids would have tried if I hadn't been afraid of teeth breaking.  However, she had a great time with the kit and it was a fun decoration on our table.


While in town yesterday, I saw a kit for a gingerbread house and, on a whim, I purchased it for Angelina. 


This kit is newer and says that the gingerbread house is edible ... if eaten within two weeks.  The kids plan to eat it after we return from Grandma and Grandpa Golden Acres' farm.  We'll see how good it tastes after that long!


Chock full of sugar ... a kid's dream concoction!

Birthday cake...

... it's a little silly, but I'm making myself a birthday cake.  I saw a tantalizing picture of this cake


 in the catalog for this company and couldn't resist trying to make the blend of chocolate cake and mint ice cream.  I was going to make homemade fudge, but I purchased a jar ... just in case I got LAZY!  I'm going to use the jar of fudge

Ingredients:
Chocolate cake mix (plus eggs, oil & water)
Fudge - one jar
Peppermint Stick ice cream (from Schwans) or substitue Chocolate Chip Mint or your favorite minty flavor

Putting 'it' together:
The cake was baked last night, I let it cool on the counter overnight (you wouldn't need to wait that long!).


This morning, I leveled the cake by cutting off the rounded top with a serrated knife... I didn't want a leaning torte! .  I also cut the cake into thirds (lenthwise), so each section is a little over 4 inches wide and 9 inches long.  While preparing the cake and fudge, set the ice cream on the counter to thaw a bit.


Warm the fudge in the microwave until it is spreadable.  Spread 1/3 on the top of each cake section.  ** I didn't refrigerate at this point, but it would be a good step to add.  Then, your ice cream will not melt slightly like mine!


Spread ice cream over two sections - about 1/2 inch thick.  Stack the layers; the cake with only fudge goes on top.  Wrap the torte in plastic wrap and freeze for at least one hour.  If you want to make it 'pretty', sprinkle crushed peppermint cany over the top.  Slice as thick as needed and ENJOY!!


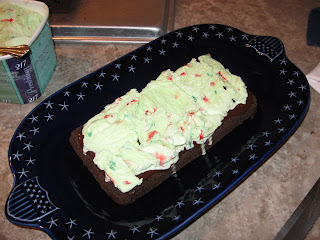
This is before freezing ... but doesn't it look yummy anyway??  I may or may not add crushed peppemints.  Maybe I'll just add another scoop of ice cream to the top of each slice.

** UPDATE:  Make sure to cool the layers of fudge topped cake in the frig before topping with ice cream.  My ice cream melted - pretty much all of it - even though I thought my fudge was cooled and the completed cake was taken to the freezer immediately.  It still tasted wonderful because the peppermint ice cream soaked into the cake layers, but it didn't look as pretty.

Tuesday, November 3, 2009

November 1-7 Menu

As always, a bread (biscuits, beer batter bread, croissants, etc.), salad, fruit or veggies are generally added to the main dish.  If I'm in the mood, I sometimes whip up a salad other than lettuce.

Sunday
Dinner: Pancakes and deer sausage
Supper: Country Church Fundraiser - Buffalo Supper

Monday
Dinner: Veggie Soup
Supper: Sandwiches for the Road & Field!

Tuesday
Dinner:  Leftovers (Veggie Soup)
Supper: Enchilada Stuffed Shells  (double and freeze one entree)

Wednesday
Dinner: Crock Pot - Roast Chicken (I usually roast two at a time)
Supper: Roast Chicken with stuffing

Thursday
Dinner: Chicken ala King (over biscuits)
Supper: Leftover (whatever needs eating)

Friday
Dinner: Tuna quesadillas
Supper: Clam Chowder

Saturday
Dinner: Leftovers (whatever needs eating)
Supper: Spaghetti w/ meat sauce

Thursday, October 29, 2009

Gotta Try This ... Cookie Cake

I've been reading the King Arthur Flour cooking blog and this entry was too interesting to resist trying!  The tester used King Arthur mixes, but I've used a 'from scratch' chocolate chip cookie dough and local brand name cake mix (Butter Pecan flavor - although I think almost any flavor would work).  This would make a great birthday cake.


Family Rating: ***** ... and that's without ice cream!

Cookie Cake
Yield:  20 svgs.

Ingredients:
Chocolate Chip Cookie Dough (ingredients below)
Butter Pecan flavored Cake mix batter (3 eggs, 1/3 cup vegetable oil, 1 1/3 cups water)

Chocolate Chip Cookie Dough* Ingredients:
1 1/4 cup all purpose flour
1/2 tsp. sea salt
1/2 tsp. soda
1/2 cup butter, softened
1/2 cup brown sugar
1/2 tsp. vanilla
1/3 cup water
1 egg
1 cup mini chocolate chips (semi-sweet)**

Directions: 
1.  Preheat the oven to 350 degrees.
2.  Mix flour, salt & soda together.  Set aside.  Cream butter, sugar, water, egg and vanilla in another bowl for 3 minutes.  Add dry ingredients to the creamed mixture.  Mix on medium speed for 2 minutes.  Mix chocolate chips into the dough.
3. Lightly spray a 13x9 inch pan (it's important that the pan be as least 2 inches deep) with cooking spray.  Spread the Chocolate Chip Cookie dough in the pan. 


4.  Bake for about 12 minutes or until the edges start to brown lightly.  The middle should NOT be completely baked.  Remove from oven and set aside (if there's time!).
5.  While the cookie bottom is baking, mix the cake batter according to directions on the box.
6.  Pour the cake batter over the partially baked cookie dough.  Spread evenly.


7.  Bake for an additional 30-38 minutes.  Keep an eye on the browning ... if it browns too quickly, place a foil tent over the pan.
8. The cake is done when a tester comes out clean or with a few crumbs.
9. Eat and thoroughly enjoy!  It won't last long ...


Note:  The KA blog recommends serving with a scoop of ice cream and chocolate syrup.  I was out of ice cream and didn't need the chocolate syrup.  STILL tasted yummy and the kids didn't talk a bit while eating their treat.

*I actually had to search through my cookbooks for an appropriate recipe.  I usually don't make 'plain' chocolate chip cookies; I prefer an Oatmeal Chocolate Chip Recipe or a Peanut Butter Chocolate Chip Recipe.  Additionally, the two recipes I mentioned are huge!  I didn't feel like baking cookies on top of making the cookie cake, so I looked for a smaller recipe, too.

**You could substitute regular sized semi-sweet chocolate chips, but the minis are really nice and distribute the chocolate throughout the batter in a more pleasing way.

Wednesday, October 28, 2009

Manicotti Alla Romana

This is a new recipe to me.  I've had the manicotti pasta on hand for a while and decided during menu planning that it was time to 'use it'.  So, while this recipe doesn't recommend or even talk about doubling and freezing, that's my experiment.  I'm quite certain it will work because I frozen similar dishes with great results.  I am planning to change the recipe from the original I found online, so I can give you my ingredients and extended directions.  Please note that the ingredients are for a double batch and I do plan to freeze half.  This recipe is a bit time-consuming, so the double batch makes it more worthwhile for me.

FAMILY RATING:  *****

This recipe is soooo good.  For our family, one manicotti was enough for the three youngest.  Graham would have had enough with 1/2 or 3/4 of a manicotti, but I dished him without thinking.  He ate it anyway (I'm sure he's stuffed!) because the Cookie Cake Dessert was enticing.  I served the main dish with vegetables, so there should be enough left for dinner/lunch tomorrow, as long as I supplement with veggies or garlic toast. 


Manicotti Alla Romana (Doubled)
Yield: 14 servings (7 large adult servings per dish)

Ingredients:
2 Tbls. Olive oil
1 cup chopped onion
6 cloves minced garlic
2 lbs. ground beef
Sea Salt to taste
1 (10 ounce) package frozen chopped spinach, thawed and drained*
2 – 15oz. containers Ricotta Cheese
2 eggs, beaten
6 cups spaghetti sauce, divided
4 Tbls. Butter
4 Tbls. All purpose flour
4 Tbls. Beef bouillon
4 cups half & half
½ cup chopped fresh parsley
2 Tbls. Chopped fresh basil
1 cup grated Parmesan Cheese

Directions:
1. Heat oil in large skillet over medium heat. Saute onions until translucent. Add minced garlic and sauté for 1 minute more. Stir in ground beef. Cook until well browned. Season with sea salt and set aside.


2. Cook spinach according to package directions.

3. Bring a large pot of lightly salted water to boil. Add manicotti tubes and parboil for half the recommended time on the package. Drain and cover with cool water to stop the cooking process and prevent cracking.


4. To the ground beef, add the cooked spinach and ricotta cheese. When the mixture is cooled, add beaten eggs. Spread 1/4 cup of spaghetti sauce in the bottom of each 9x13 inch pan. Gently drain the manicotti tubes and carefully stuff each one with meat and cheese mixture. I put the mixture in a Ziploc storage bag, cut the corner and squeezed the mixture into the tubes. Place half the pasta in each pan. Cover with a damp cloth to prevent cracking.


Meat and ricotta cheese mixture (above).


13x9 pans prepared with 1/4 cup spaghetti sauce.


Meat and ricotta cheese mixture in a ziploc bag and ready for squeezing into the manicotti tubes.

5. Preheat oven to 350 degrees.

6. Prepare the white sauce by melting the butter in a medium saucepan over medium heat. Stir in flour and beef bouillon. Increase heat to med-high and cook while stirring constantly, until it begins to bubble. Stir in ½ & ½ and bring to a boil, stirring constantly (a whisk works best). Cook for 1 minute. Remove from heat and stir in parsley. Ladle half the sauce over manicotti in each pan.

7. Stir the basil into the remaining spaghetti sauce. Ladle half the sauce over the white sauce in each pan. Try to layer the sauces without mixing.


Manicotti tubes are filled and placed in 13x9 pans (above).  Ready for baking or for freezing (below).


8. Cover aluminum foil and bake for 40 minutes. Remove from oven, uncover and sprinkle with Parmesan cheese. Bake uncovered another 10 minutes.


Freezing Directions: 
After layering the sauces on the second pan, cover with plastic wrap and with a layer of heavy-duty aluminum foil. If you prefer, you can even measure the parmesan cheese into a baggie and freeze between the plastic wrap and foil. Label with the following instructions: Thaw completely in frig (this may be more than overnight). Remove plastic wrap and recover with aluminum foil. Bake at 350 degrees, or until done. Remove from the oven, uncover and sprinkle with Parmesan cheese. Bake uncovered another 10 minutes.

*If you decide not to double, it’s okay to use a full 10 oz. package of frozen spinach per ‘batch’.

An Additional Note:  I used a gallon size freezer bag, but it may be more manageable to use a quart sized bag.

And, a confession ... I forgot to add the eggs to the meat and cheese mixture!  However, the dish was still delicious and no one but me knew about the omission.

Tuesday, October 27, 2009

Peanut Butter Blossoms


Last week, Angelina and I mixed up a quick batch of Peanut Butter Blossoms.  I use my smallest cookie scoop (it's about 1 Tbls. in size) to scoop the batter onto a plate. 


Angelina rolled the scoops into balls and then rolled them in sugar and placed them on cookie sheets.  Using my large Doughmakers cookie sheets, it only takes two trips to the oven to get about 3.5 dozen cookies (if I'd have used convection, it would have been one step baking for a single batch!).  I prefer Hershey's kisses for the chocolate top; the kisses are placed right after taking the cookies out of the oven.


After cooling completely, the Peanut Butter Blossom cookies are stored between layers of waxed paper in the freezer.  I have a small collection of Christmas tins, but they are still in storage ... so, these cookies will be frozen in Tupperware containers.  They can be stored at room temp. for 1 week or frozen for up to 3 months.

Holiday Goodies still on the list:
  • Divinity
  • Cashew Brittle
  • Pizzelles
  • Turtle Cookies
  • Suzie's Favorite Sugar Cookies
  • Creme de Menthe Brownies
  • Chocolate Dipped Shortbread Cookies
  • Jam Thumbprints
  • New This Year (my experimental recipe): Chocolate Caramel Thumbprints
 Note:  I keep a master list of what I've frozen.  However, I try NOT to remember all the goodies going into the freezer until it's really time for them to be used!

Saturday, October 24, 2009

October 25-31 Menu

Menus are flexible in my house.  That means if leftovers last longer, I get a free pass for a meal or two!  Here's what I have planned for this coming week: October 25-31.  As always, a bread (biscuits, beer batter bread, croissants, etc.), salad, fruit or veggies are generally added to the main dish.  Although, additions have been a little forgotten during these last weeks of pregnancy - at least I'm getting a meal on the table.

Sunday
Dinner: French toast w/ deer sausage
Supper: Taco Bar at our 4-H meeting


Monday
Dinner: Healing Cabbage Soup (I need to use up a half a cabbage)
Supper: Leftovers or sandwiches (traveling for Angelina and I = sandwiches)


Tuesday
Dinner: Hamburger Hotdish (double and freeze one entree)
Supper: Leftovers (Hamburger Hotdish)


Wednesday
Dinner: Hot Ham & Cheese sandwiches
Supper: Manicotti Alla Romana (double and freeze one entree)


Thursday
Dinner: Leftovers or sandwiches
Supper: Pizza


Friday
Dinner: Tuna sandwiches
Supper: Shrimp Alfredo


Saturday
Dinner: Leftovers (whatever needs to be eaten)
Supper: Crock Pot: Whole Chicken with Veggies

I don't plan breakfasts.  We have a variety of choices available: cold & hot cereal, bagels, English muffins, bread, eggs (for those old enough, but many weeks I'll have cold boiled eggs in the frig), yogurt (homemade) and in-season fruit.  Cold cereal ends up the common breakfast, but I'm working on it.

Friday, October 23, 2009

Fresh Bread

I've been craving fresh bread.  I should just set my breadmaker on the counter, but the counters already have enough clutter and the sight of the bread machine would probably just make me feel guilty!  So, upon finding this recipe for Easy Batter Bread and seeing it's simplicity, I thought I'd give it a whirl.  It has a texture similar to beer batter bread and probably wouldn't hold up for sandwiches. 


While it rose fine before baking, for some unknown reason it fell a little in the middle during baking; but it tasted yummy with apricot jam and plum jelly.  I think I'll have to get out my bread machine for the 'real' bread texture I'm craving.


Tuesday, October 20, 2009

October 18-24 Menu


This is the menu I have planned for October 18–24 (we usually add biscuits, salad or veggies to the main dish):

Sunday
Dinner: Traveling – fast food
Supper: Traveling – fast food

Monday
Dinner: Tater Tot Hotdish with Romaine lettuce salad
Supper: Ham and Swiss cheese sandwiches

Tuesday
Dinner: Fiesta Chicken Pasta Soup (doubled)
Supper: Leftover Fiesta Chicken Pasta Soup

Wednesday
Dinner: Leftovers (Tater Tot Hotdish or Fiesta Chicken Pasta Soup)
Supper: Crock Pot Beef Roast

Thursday
Dinner: Hot Beef and cheese sandwiches
Supper: Beef Stroganoff with Rice (or mashed potatoes)

Friday
Dinner: Oven-baked Tuna Melts
Supper: Clam Chowder

Saturday
Dinner: Leftovers (Beef Stroganoff)
Supper: Italian Sausage Soup (doubled & I plan to freeze half)

Tuesday, September 29, 2009

Super Green Tea


Up until now, I hadn't found a Green Tea I enjoyed sipping.  This is now my favorite.  It's not the ordinary bland green tea ... it has a little zing to it.  I highly recommend it!

Thursday, September 24, 2009

Not your usual pear sauce.

Zeke would eat a pear before any other fruit ... and Graham will eat almost any fruit.  The two of them have been having a pear a day since I picked up my lug last week!  It's a great snack and not so sweet as other fruit.  So, the pear sauce is a treat for Zeke, usually. 


Suzie's Spiced Pear Sauce - approved by Zeke, Graham and Angelina

My normal method of preservation is peeling, coring, and quartering the pears to preserve them in a light syrup.  This year, I wanted to try something new ... pear-sauce that resembles applesauce.  I found a couple recipes and proceeded to try one out.  At a point in the recipe, it said to use the 'old taste method' to adjust spice and sweetness.  I adjusted to the point of it being a different recipe, so I'll post it below. 

Suzie's Spiced Pear Sauce
Yield:  9.5 pints  (I only canned 8 pints because that's all my canner will hold in one batch.  The rest is for snacking!!)

5 quarts peeled, cored and diced pears*
2 quarts water**
1 1/2 cups sugar***
1 Tbl. lemon juice
1 Tbl. vanilla
1 tsp. cinnamon
1 tsp. nutmeg
1 tsp. ground Cloves
1 Tbl. Stevia powder***

1.  Prepare the pears by peeling, coring and dicing/pureeing.  Put the prepared pears in a large stock pot or dutch oven.  Add the water, sugar, lemon juice, and stevia.


2.  Bring to a full, rolling boil, then reduce heat to create a low boil.
3. Add the vanilla and spices.  Continue cooking at a low boil for 15 minutes.  If you've chosen to dice the pears, boil until their texture is at your preference.  I used a potato masher to make the pear chunks smaller in my first batch.


4.  Hot water bath the pear sauce in pint jars for 12 minutes.


*For the first batch, the chunks of pear were about 1/2 inch cubes.  It left the sauce chunky.  I plan to puree the next batch to make it even more like applesauce.

**I used the full amount of water in my first batch.  I plan to cut back to 1.5 quarts water for a thicker sauce.

***At first, I used only 1 cup of sugar, but with the amount of spice the original recipe called for, it wasn't sweet enough for my taste.  The original spice combination tasted bitter to me, too.  So, I added the extra 1/2 cup sugar and added cinnamon.  The spice combination was much improved, but it was still not enough sweet.  So I added 1 Tbl. stevia, which is equivalent to 1 cup sugar in sweetness, to make the pear sauce taste the way I wanted.  If you want, you could cut the sugar to 1 cup and make up for the sweetness with extra stevia.  Use the taste test!

Friday, September 18, 2009

Peppers - Green and Purple??

While Jules was visiting, she also took the kids over to Grandma Green Acres' garden to make sure all the produce was picked.  Grandma & Grandpa Green Acres have been on vacation and left the kids in charge of the garden.  I haven't made it over, so was very grateful Jules took on this task.  They picked raspberries, strawberries, tomatoes, and peppers. 

In our garden, they picked 13 zucchini - only one of which was still usable (the rest were quartered for composting) and tomatoes!!!  The tomatoes you see on the counter are from my sprawling tomato garden - and they are red.

The peppers were purple and green.  I haven't raised purple peppers before, but their flavor is very mild.  I cleaned and sliced all the purple peppers.  At the end, 9 bags of sliced purple peppers went into the freezer.  Of the green peppers, 3 were sliced and one was diced.  I used to blanche the peppers, but have since learned it's an unnecessary step. 


So, the raw peppers are bagged and Food Saver seals the bags for freezing.  Slick and easy.  Ready to go for a winter casserole or soup.  I do label and date the bags before freezing, BTW.